How to Send Emails from Lovable with Mailtrap Integration
Integrate Mailtrap with Lovable using Supabase Edge Functions. Set up contact forms, send emails, create contacts, and track deliverability easily.

In this tutorial, I'll show you how to integrate Mailtrap’s Email API into your Lovable application using Supabase Edge Functions to build reliable user authentication and onboarding email workflows.
For the demo application, I’ll showcase a basic contact form, although the flow can work for any Lovable application.
Disclaimer: Don’t forget to adjust the prompts from this article according to your needs.
Step 1: Account setup and configuration
Before implementing any email logic in Lovable, you first need to set up your Mailtrap account and securely store your credentials.
Start by creating a Mailtrap account and verifying your sending domain. This is a required step that takes ~15 minutes to complete.
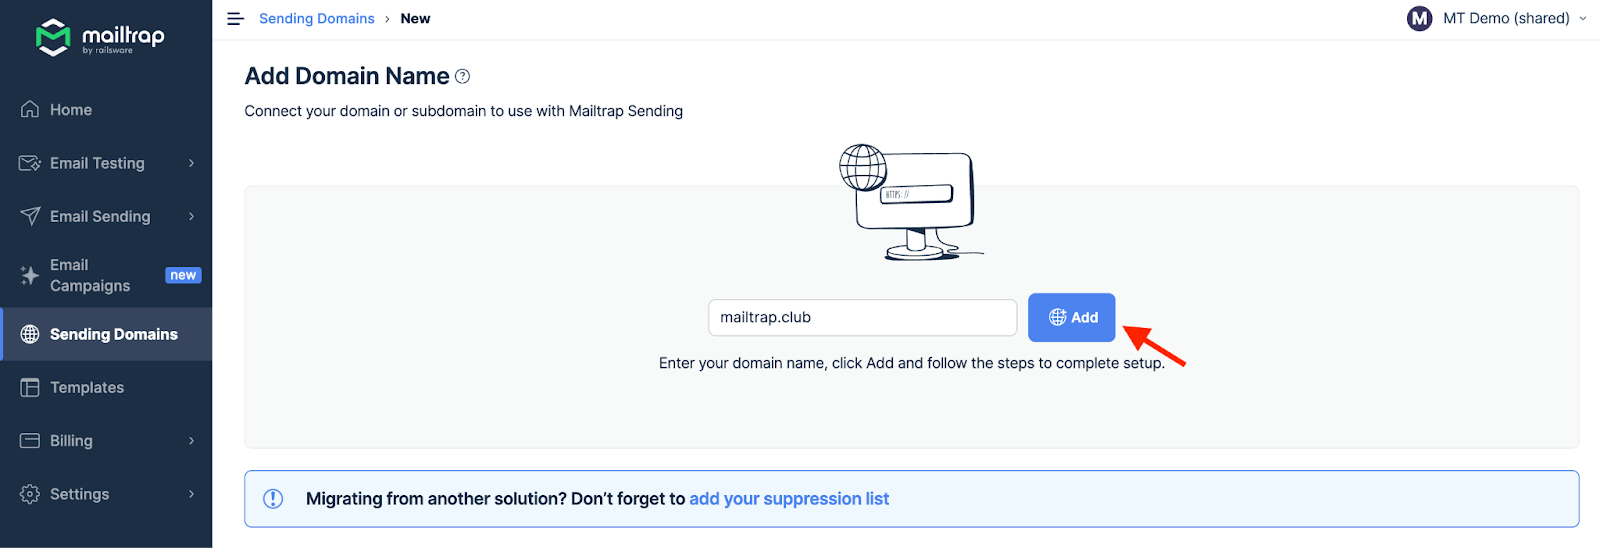
Add and verify your domain
In your Mailtrap dashboard, navigate to Sending Domains. Add your application domain (e.g., auth.yoursaas.com) and configure the required SPF, DKIM, and DMARC DNS records. You can use an SPF generator to easily create a valid SPF record for your domain. These records authenticate your emails and prevent them from being flagged as spoofed or malicious.
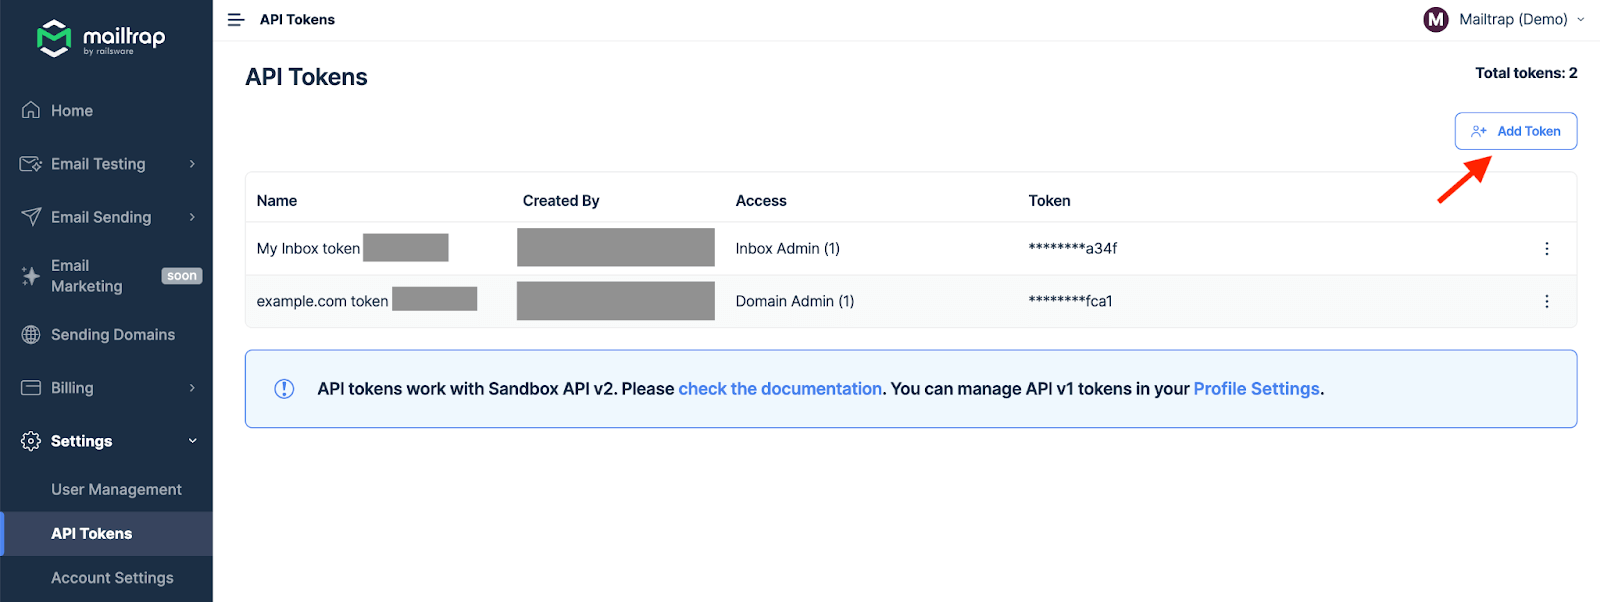
Generate an API token
Under Email API settings, create an API token with sending permissions. Store this token securely since it's the authentication key for all your email requests.
For detailed setup instructions, check out this step-by-step guide on sending emails with Lovable
Step 2: Connect to Supabase
Lovable uses Supabase (built-in integration) to manage authentication, database, and backend.
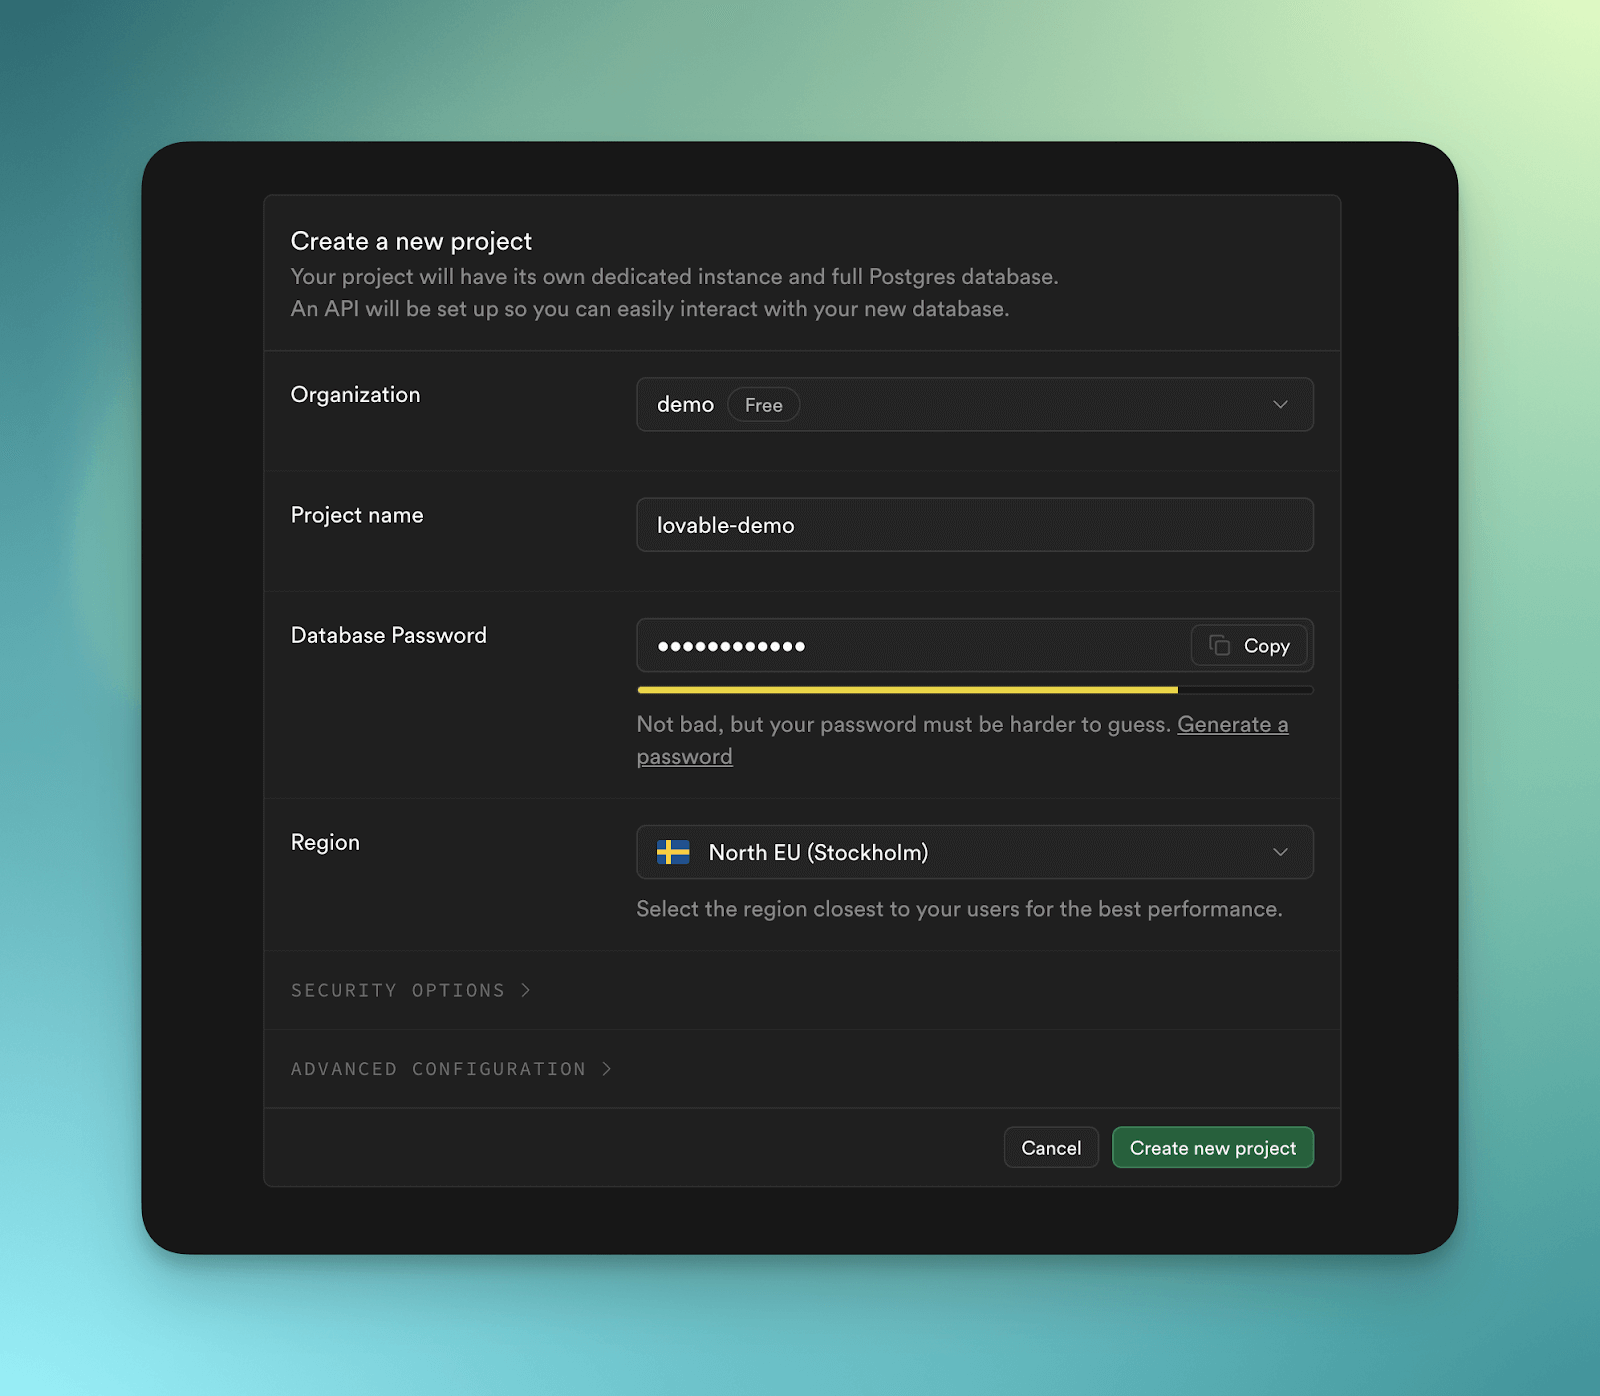
To connect your Lovable project to Supabase for authentication, database, and backend, click on click on the Supabase icon in the upper-right corner of your project. Then, enter a project name, password, and choose the region closest to your recipient.
Once you create a new project, Lovable will confirm you have successfully connected your app to Supabase.
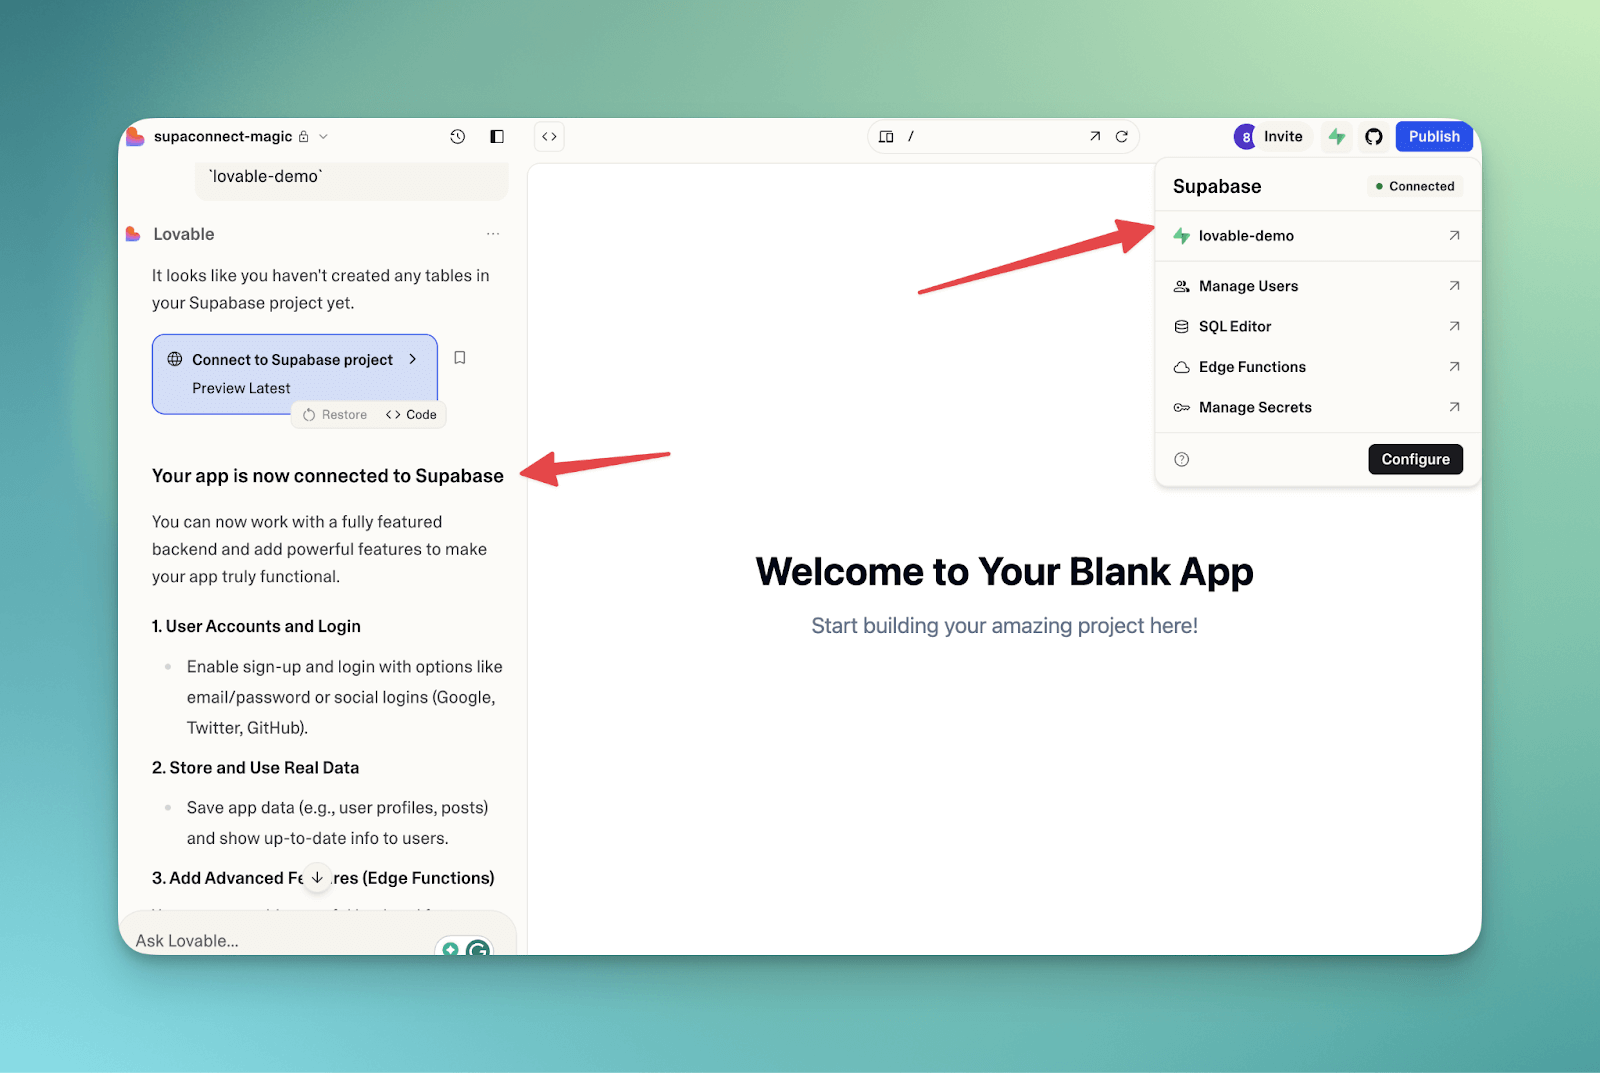
Note: Keep in mind that your Secrets in Supabase should look something like this:
MAILTRAP_ACCOUNT_ID=1318706
MAILTRAP_API_KEY={{your-mailtrap-api-key}}
MAILTRAP_MY_EMAIL=myemails@example.com
MAILTRAP_FROM_EMAIL=form-submissions@demoatmailtrap.com
Step 3: Create a contact form
To create a contact form, you can use the following prompt, just make sure to insert your company info, website structure, and add any other details you need:
Create a contact form that collects the full name, email address, and message.

// Note: provide more info about your company, if you have any screenshots, design files, copy - mention all of that and attach

<company_info>

[Enter your company info here to give Lovable AI some context]

</company_info>

My landing page should have such a structure:

<website_structure>

Contact form with name, email, and message fields, with a submit butto

</website_structure>

// Note: provide your info about domains, emails, account ID, keys to use, etc. If you add keys manually to Supabase Secrets, mention that (or Lovable might ask you to add it there directly or via its integration). You might also keep email_from and email_to in the Secrets for an easy change across the project

Make sure this form works like this:

<form_functionality>

Add browser validation for the email input in the form, so only a valid email will pass
Add a minimum length of a message field of 50 characters, and a maximum length for the Name input of 100 characters.
As a customer submits a form (each form submission):
Send an email with its content to my email MAILTRAP-MY-EMAIL secret variable
Emails should be sent from form-submissions@demoatmailtrap.com (MAILTRAP-FROM-EMAIL), as demoatmailtrap.com is my verified domain in Mailtrap
Create a contact in Mailtrap (name, email).
Pass value from the form's "Full name" input to Mailtrap's custom field name.
Create contacts table in Supabase with such columns as:
id : UUID, primary key
name : text
email : text
message : text
created_at : timestamp
mailtrap_contact_id : text
Add info about a form submission to the Supabase contacts table as well, and write info if the contact was submitted, its Mailtrap Contact ID (Returned with a response). Apply Supabase Row-Level Security (RLS) to restrict access to only authenticated users.
As the form is submitted, display that state and notify the visitor that it's submitted.
Email should be sent via Mailtrap, as I have an account there:
My Mailtrap account is MAILTRAP_ACCOUNT_ID (from it in Supabase Secrets)
Here is a link to Mailtrap NodeJS SDK and its documentation: https://github.com/railsware/mailtrap-nodejs. Use it to create contacts and send emails to myself. Save Mailtrap API key in MAILTRAP_API_KEY secret.
Include and use Mailtrap NodeJS SDK (https://www.npmjs.com/package/mailtrap) to send emails and create a contact in Mailtrap. Use the latest available version of the npm package. Its documentation:
Readme https://github.com/railsware/mailtrap-nodejs/blob/main/README.md
Examples for implementation https://github.com/railsware/mailtrap-nodejs/tree/main/examples. Particularly:
How to send an email https://github.com/railsware/mailtrap-nodejs/blob/main/examples/sending/minimal.ts
How to create a contact https://github.com/railsware/mailtrap-nodejs/blob/main/examples/contacts/everything.ts
</form_functionality>

Plan step-by-step, verify results after each step. Verify all steps work before continuing with the next one. Write code in Typescript, generate atomic files in the Supabase Edge function so it's easier to verify and debug.
Lovable will then provide you with an implementation plan, which you can verify and proceed to implement.
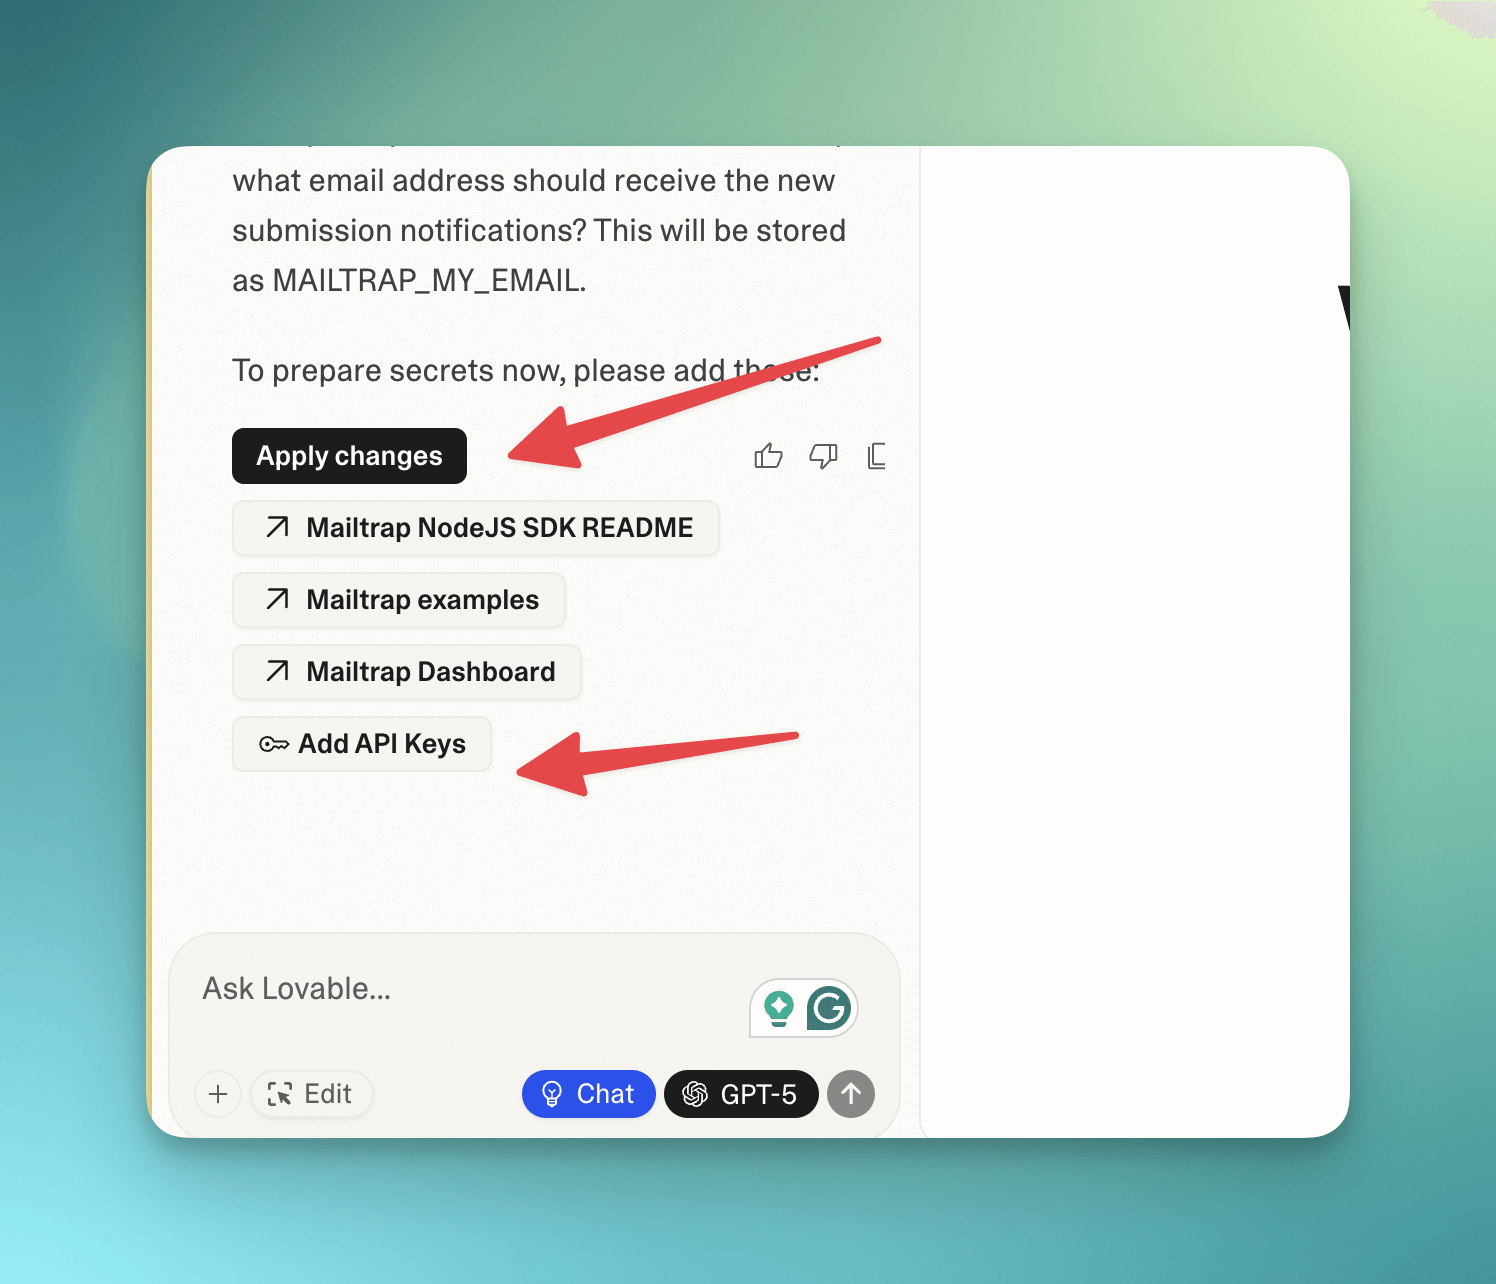
Next, all there’s left to do is to add the following credentials:
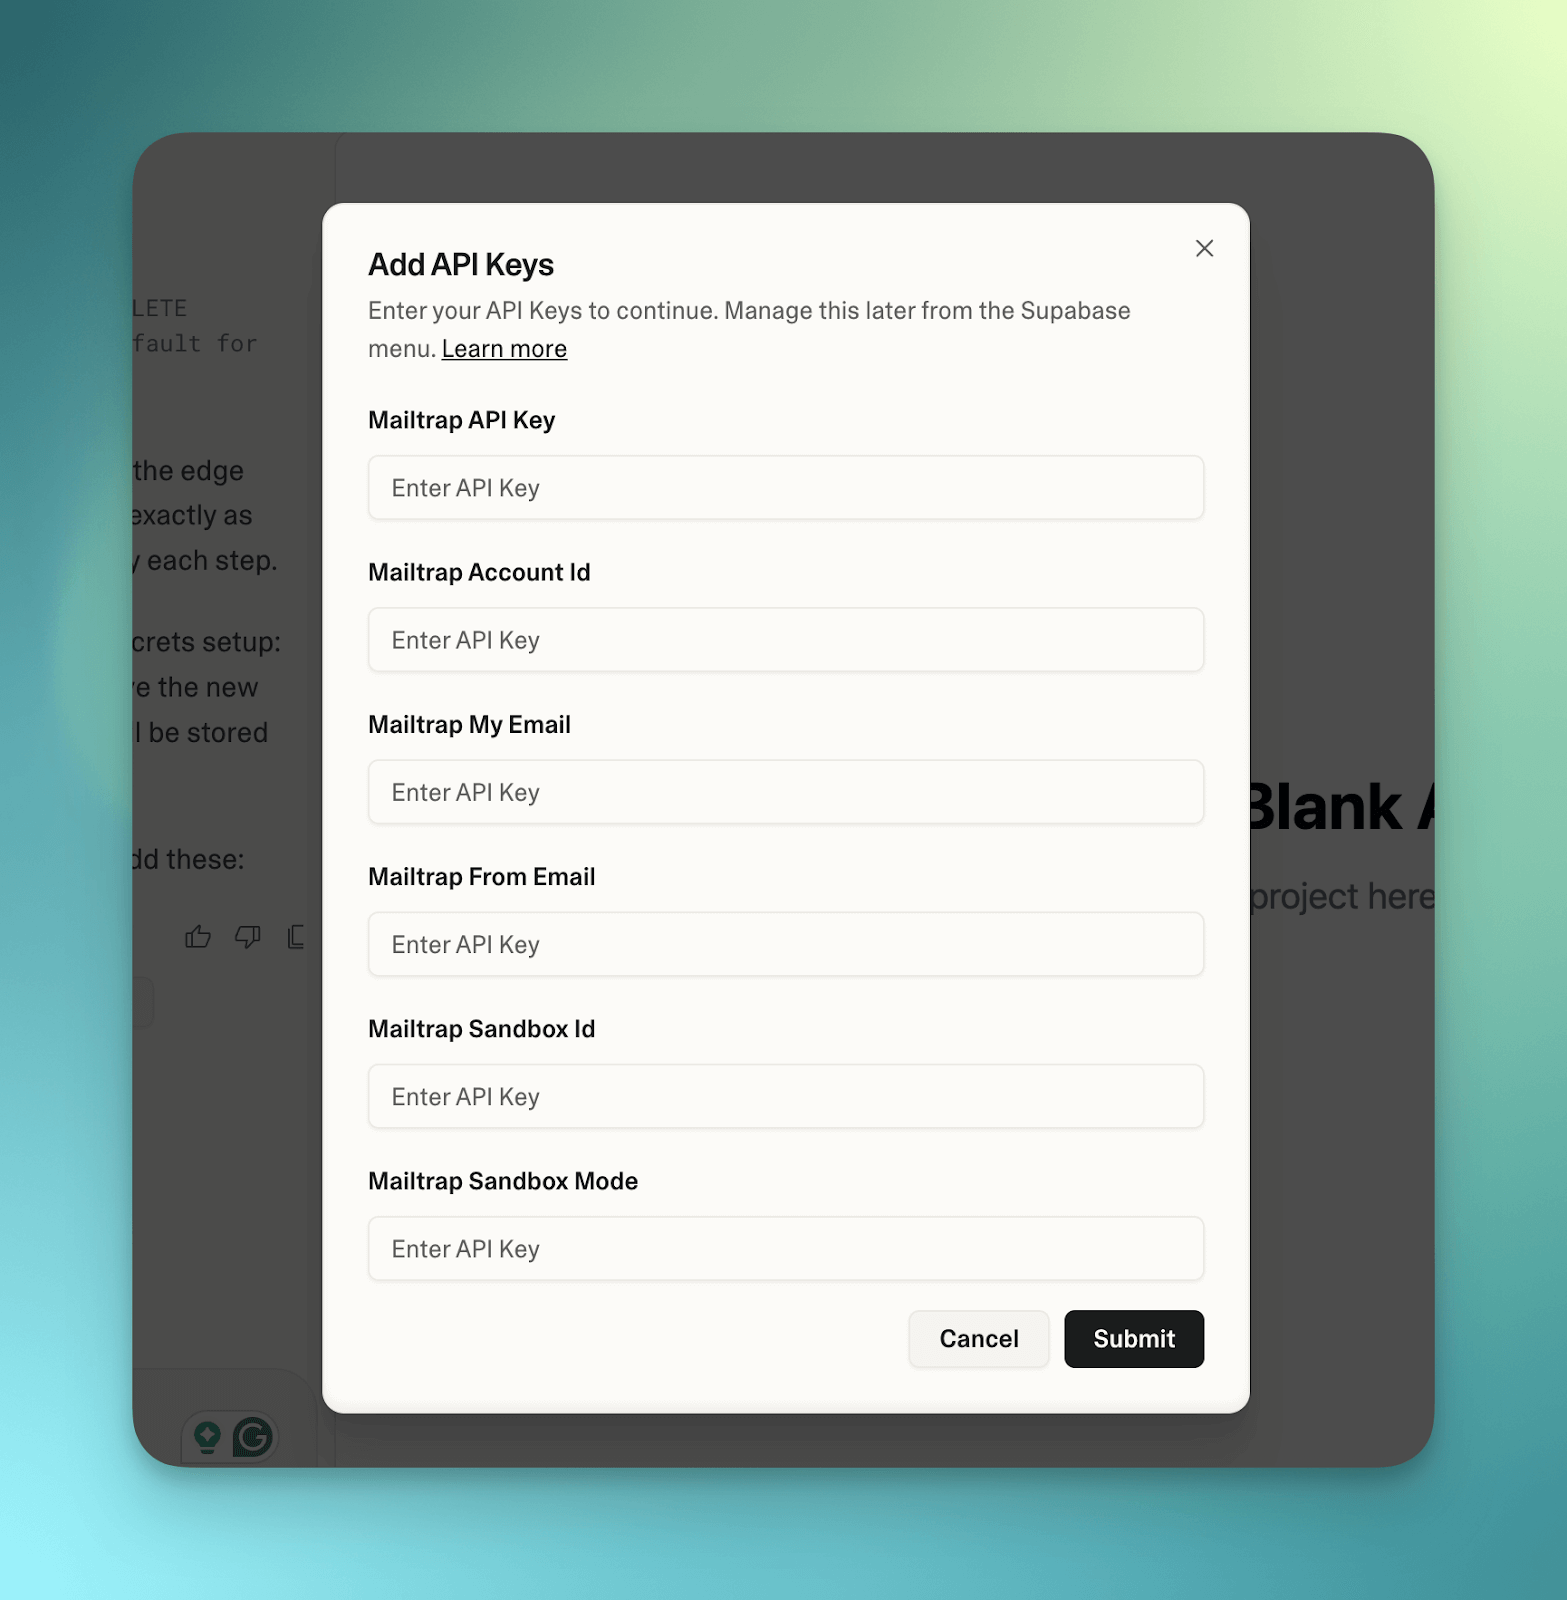
Note: Sandbox Mode is optional, use it if you want to test your emails.
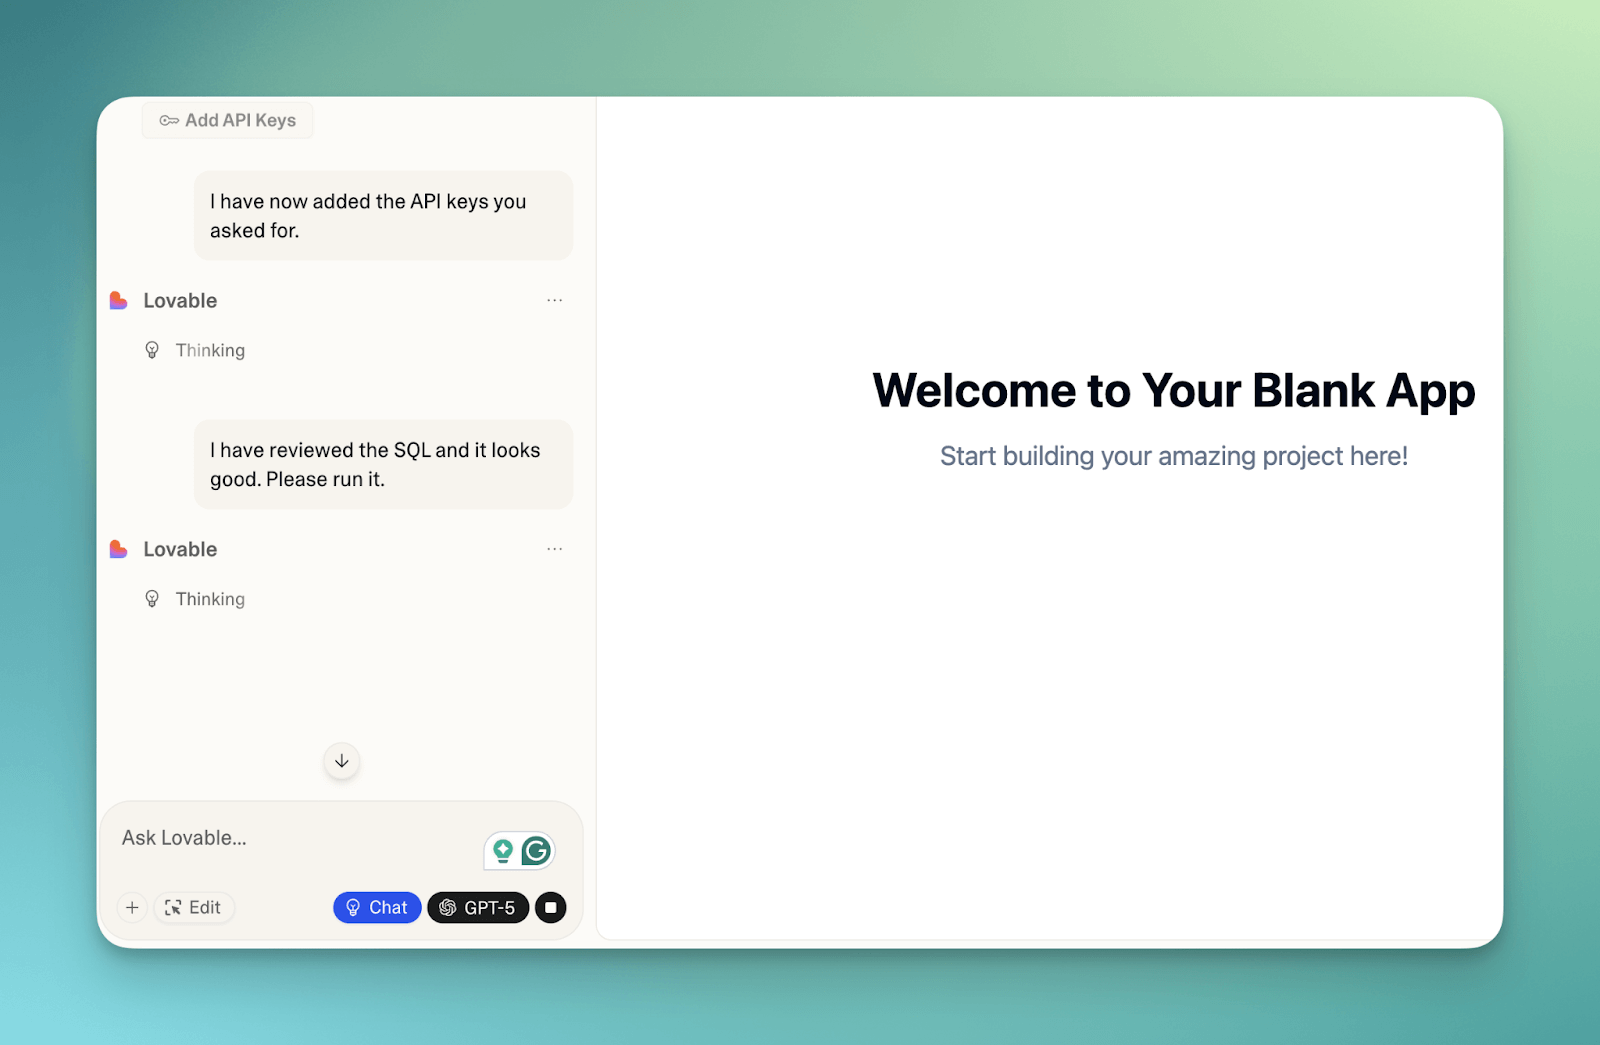
And finally, apply proposed changes to create a database in Supabase:
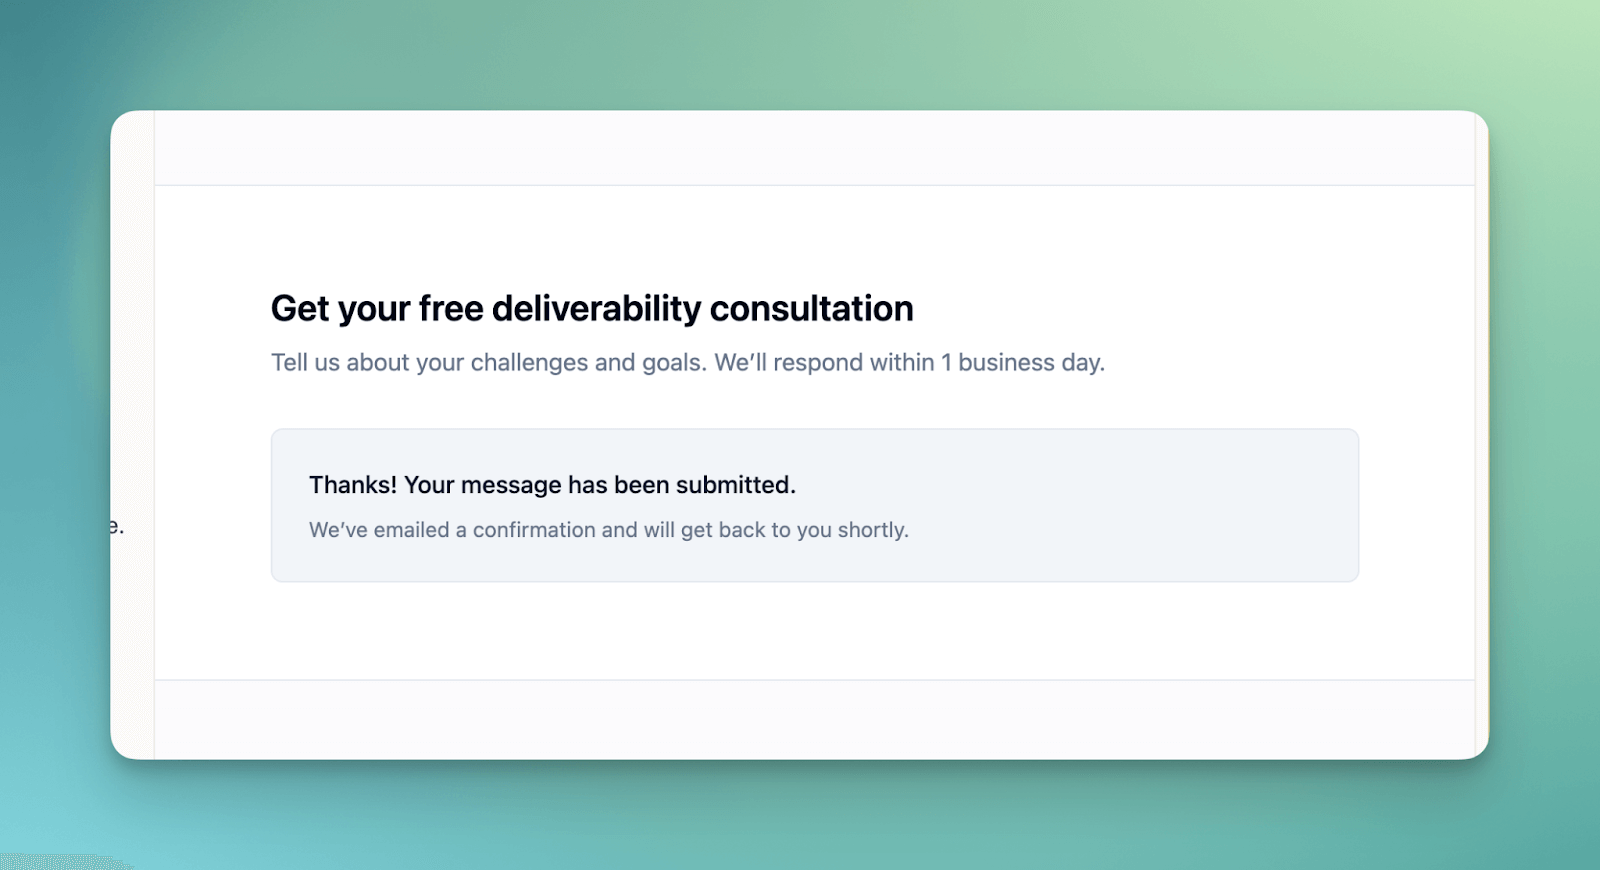
Step 4: Send emails via Lovable
Upon submitting the form, you should see the following message, but keep in mind that it's OK not to work from the start sometimes.
Tip: If you encounter any issues, check the Edge Functions log errors in Supabase, pass it to Lovable, and ask the AI to fix it.
Step 5: Track email deliverability
To maintain high deliverability for authentication emails, you need to continuously monitor the performance of your emails.
Deliverability monitoring
Once live, Mailtrap provides critical visibility into your authentication email performance.
Track key metrics:
Delivery Rate: Authentication emails should maintain 99%+ delivery
Open Rate: Indicates inbox placement vs spam folder
Click Rate: Shows if users engage with reset links
Bounce Rate: Identifies invalid emails in your database
Set up alerts: Configure webhooks to notify your team when:
Delivery rates drop below 98%
Bounce rates spike above 2%
Any authentication email fails
Handle edge cases
Authentication emails face unique challenges. Implement these safeguards:
Rate limiting: Limit password reset requests to 3 per email per hour to prevent abuse.
Token security: Store reset tokens as hashed values, never in plain text.
Expiration handling: Clearly communicate when reset links expire and provide easy re-request options.
Conclusion
By integrating the Mailtrap Email API into your Lovable application with a focus on authentication workflows, you've built a professional-grade email system that your users can rely on.
Unlike basic SMTP solutions, Mailtrap provides the deliverability infrastructure, and analytics needed for mission-critical transactional emails.
Additionally, make sure to monitor the performance of your emails so that you can optimize your sending functionality and keep track of the progress of your SaaS application.
About the Author

Rachel Hammond
Rachel Hammond is an AI tools writer and content automation specialist at Postunreel, where she covers everything from AI carousel generators to social media scheduling workflows. She has spent five years helping digital creators and marketing teams understand how to use AI tools practically — not just theoretically. Rachel personally tests every tool she writes about, documents real results, and breaks down complicated AI features into simple, step-by-step guides that anyone can follow regardless of their technical background. Her work focuses on saving creators time while helping them produce content that genuinely performs.
🔥 Limited Time Deal
NewGet lifetime access to Postunreel with a one-time payment. Never pay again!
Your Go-To Solution for Stunning Carousels using AI!
Postunreel is a free AI carousel generator tool that helps you design captivating carousel posts for LinkedIn, Instagram, and other platforms. It makes it easier to increase social media engagement and grow your audience.
Create Free Carousel Now 🚀Related Blogs
One Idea, More Surfaces: The Repurposing Chain's Missing Link
Discover how content repurposing can extend beyond social media by adding digital out-of-home (DOOH) to your strategy for greater reach and visibility.
How to Write Carousel Content That Doesn't Sound Like AI
Learn how to write carousel content that doesn't sound like AI with practical editing tips, natural writing techniques, and a simple workflow for engaging social media posts.
How to Grow Your LinkedIn Following to 10K Without Paid Ads
How to grow your LinkedIn following to 10K without paid ads. Discover proven content strategies, profile optimization tips, and engagement techniques for 2026.